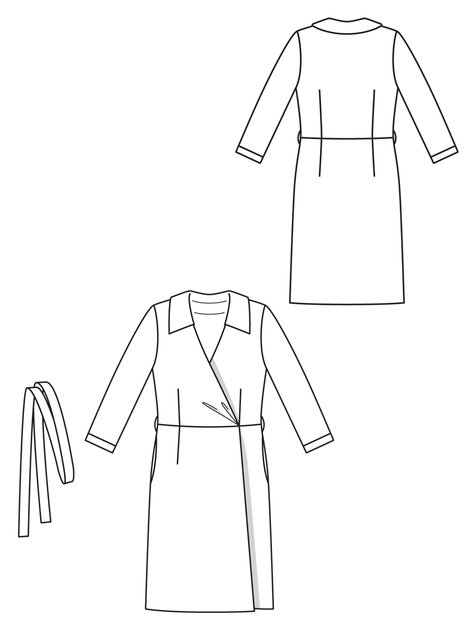
This is my first Burda dress (11/2012 #116) this year using Spotlight fabric and lined with tricot. This pattern doesn’t need lining and doesn’t come with lining pieces. I added the lining so there are no ‘visible lines’ or ‘clinging skirt’ syndrome.
Burda patterns provide just the pattern with no seam allowance. In the past this was a stumbling block for me. Lately I’ve been enjoying sewing patterns with 6mm seams so I’ve used my little magnet thingy to add the seams at the ‘tracing off the pattern onto paper’ stage. I then use the little magnet thingy again for cutting out those tricky fabric bits with the pattern.
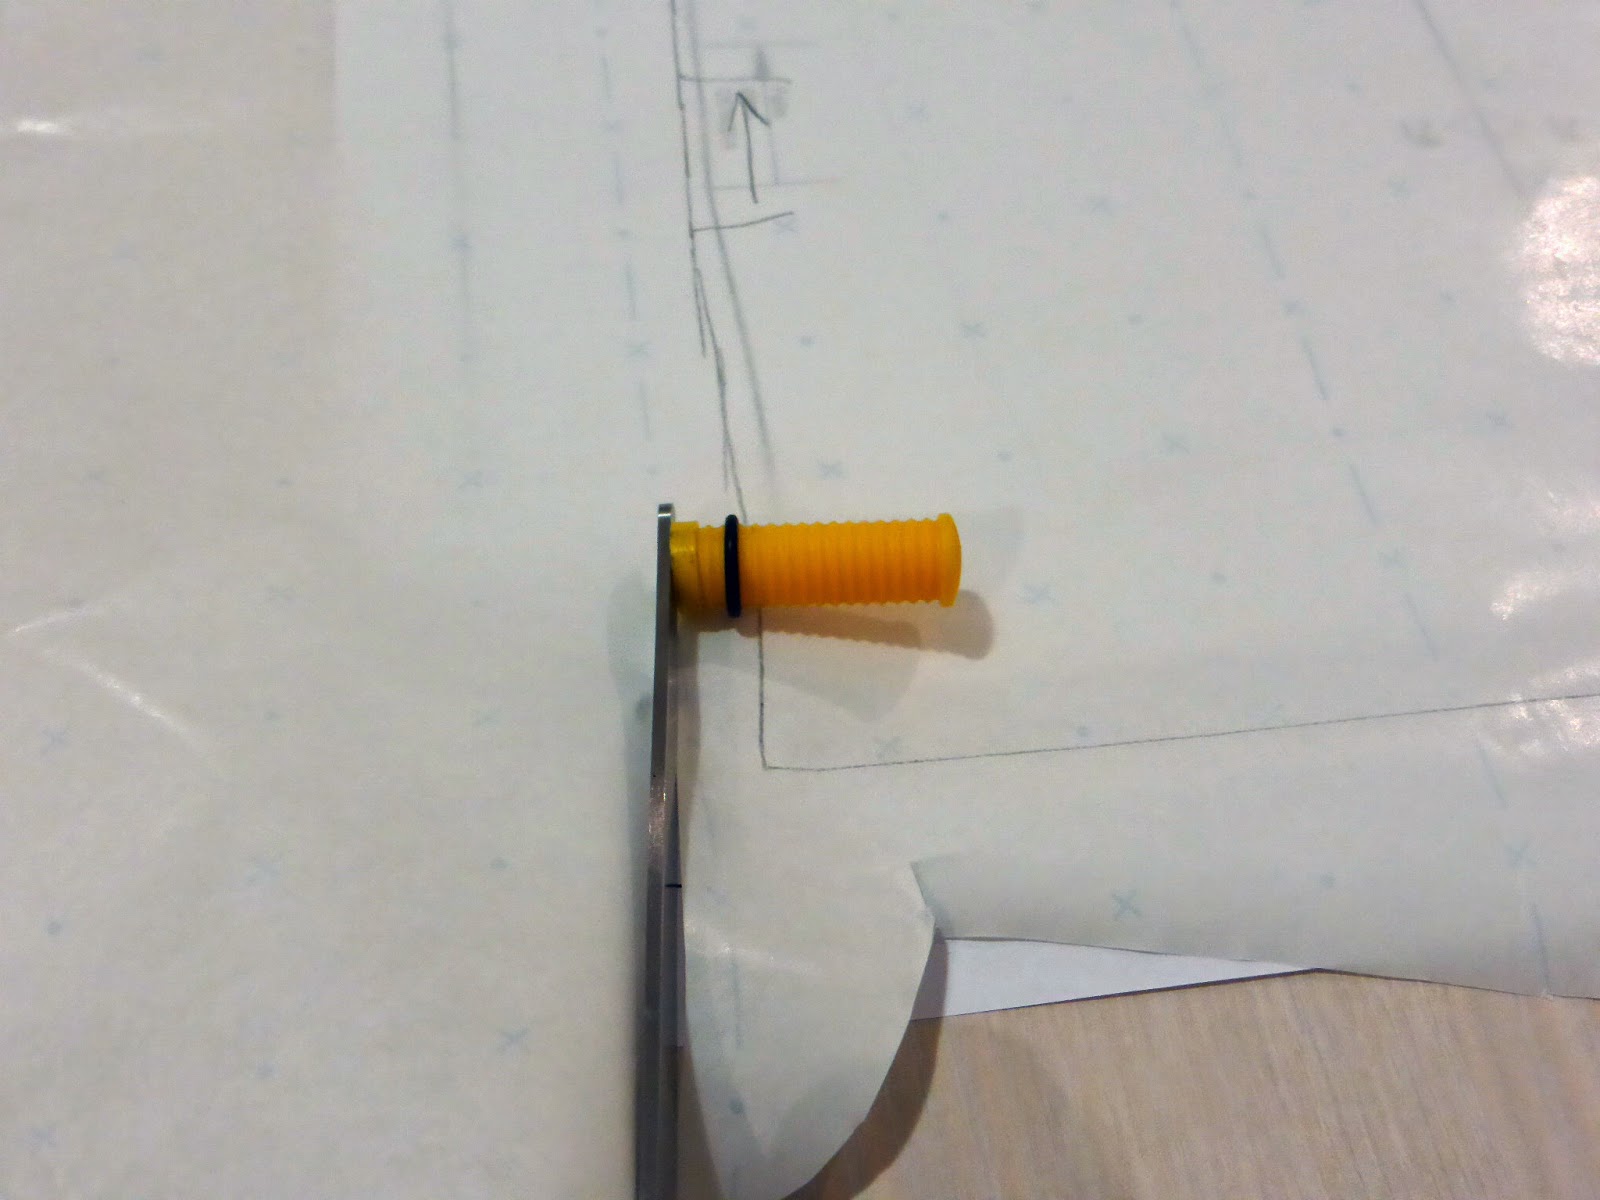 |
| Magnet thingy |
While the fabric has a subtle all-over print, there is a repeat in it. Love a good repeat challenge. It adds that extra hurdle to get my sewing projects to look more spesh.
 |
| Here’s the final dress |
If you sew Burda patterns then you would know the aspects I’m about to mention below. These notes are mostly for me to use as a reference for making future BurdaStyle patterns.

Burda sizing
This is a petite pattern. I chose size 20 for the bust and hips and 18 for the waist. When I checked the bodice during the project it was too big so I sewed 18 at the bust. If I’d checked the actual body ease on the pattern pieces, I’ve probably taken out the built-in pattern ease.
 |
| Checking for bodice fit |
Burda notches
Even with my dodgy tracing skills, the notches were spot on.
 |
| Back view |
Petite
The Burda sizing /proportions for a petite like me were also spot on. There are two petite modifications I’ve made.
Pocket petite: I made was to cut the pocket bag to a smaller depth. I don’t adjust the pocket opening, just the depth of the pocket.
Pocket petite: I made was to cut the pocket bag to a smaller depth. I don’t adjust the pocket opening, just the depth of the pocket.
 |
| A shorter pocket |
To keep the pockets from bagging, I’ve used seams great a tricot trim on the pocket seams. The pockets are sewn into the skirt side seams.
What is clever is the top of the pocket piece is also sewn into the waist seam, so the pocket doesn’t flip backwards.
Sleeve petite: I’ve shortened the sleeve at the elbow so that the wrist width is at my natural width. If I’d lopped it off at the hem, the wrist width would have bagged out.
Adjustments
Roll shoulder adjustment across the whole shoulder and on the sleeve head.
Sway back adjustment on the back bodice and the back skirt pieces. That’s why my version has a centre back seam – to add the shaping I need.
 |
| Back bodice view |
Lining
This pattern isn’t lined but I prefer lining. So the easiest way to make the lining pattern was to trace off the bodice pieces again minus the facings. That’s the beauty of having a pattern with no seam allowances.
The skirt has the facing built into the skirt front so I had to sew the lining in a few stages, in between three coffees and a good night’s rest.
 |
| Aligning and hand stitching the hem with the lining on the floor. |
Hem
My fabric was too wriggly for a mitre corner. I’ve hand sewn the hem onto the lining. I’ll try this again on the next version. If the next version is also very fine, I might interface the corner so it’s easier to mitre.
 |
| Cutting out the collar pieces |
Detailing
The sleeves have two versions – one with a cuff and one without the cuff. There’s a belt and belt loops. The closure used are two snaps. I’ve used three – one clear snap at the bust because this is a work dress. If this wasn’t a work dress, I wouldn’t add that third safety snap.
 |
| Matching the print on the sleeve pieces |
What didn’t work
I tried to add piping on the collar and the fabric was way too thin to handle the extra weight without adding additional layers of fabric. Piping is not part of this pattern. It was a feature I wanted to add. Oh well…
 |
| Ready for work |
Wrap top or wrap skirt
On the pdf, there are some lines on the front bodice indicating it could be for #115 of the same issue. I don’t have Burda 11/2012 so I can’t confirm this.
So I’m guessing it’s for a wrap top pattern. The back pattern pieces can be modified if I decide to remake this as a wrap top. That’s what I’m thinking.
So I’m guessing it’s for a wrap top pattern. The back pattern pieces can be modified if I decide to remake this as a wrap top. That’s what I’m thinking.
Which also means I could easily use this pattern for the wrap dress, a wrap skirt and a wrap top too.
I have another four BurdaStyle patterns to make and you’ll see these over the coming months:
Cigarette pants 02/2014 #129
Split neck dress 09/2014 #101
Structured peplum top 02/2014 #115
Asymmetric jersey dress 05/2014 #115
I have another four BurdaStyle patterns to make and you’ll see these over the coming months:
Cigarette pants 02/2014 #129
Split neck dress 09/2014 #101
Structured peplum top 02/2014 #115
Asymmetric jersey dress 05/2014 #115

It's beautiful – and unlike a lot of wrap dresses it sits quite high at the crossover point – most are far too low, and who wants to wear a cami under a smart dress like this?
LikeLike
That is a gorgeous professional dress. Love the collar. Looks great on you. Why oh why can't I find nice fabric at Spotties?
LikeLike
Maria…this is another make that I want in my own closet. I am working on a knit wrap dress but after seeing this beauty think I should just bin it. Beautiful!
LikeLike
What a wonderful dress!
LikeLike
This is lovely Maria. I really want to make a wrap dress now. Your fabric choice once again is fantastic. I'm going to check out the other Burdastyle patterns you've picked now!
LikeLike
I love this, thanks for all of the tips 😉 And the cigarette pants are on my radar, I can't wait to see yours 😉
LikeLike
Why hello DvF style RADNESS! This is so elegant on you, Maria! And I second team cigarette pants. They are going to be fierce!
LikeLike
Gorgeous dress! It fits you beautifully. Love the color too. Fabulous!
LikeLike
Gorgeous dress Maria. I've never tried lining a knit with tricot but I like the idea because I hate clingy knits – will this be too hot to wear in summer?
LikeLike
Very stylish wrap dress and a great idea to line it.
LikeLike
I'm with you Sarah Liz. I do have cami patterns but I'm happiest wearing a dress that doesn't need another layer.
LikeLike
I think I hang out there too much 🙂
LikeLike
I do love your most recent make. Thanks Margo
LikeLike
Sam – brilliant idea. I'm glad you like its shape too:)
LikeLike
You're welcome Nic. We could be twinsies too:)
LikeLike
Thanks Tomasa.
LikeLike
I bet you're about to do the cigarette pants too? Thanks Amanda. It's very DVF shape.
LikeLike
Oh Kristy. Tricot is perfect for highly aircon offices – anytime of the year.
LikeLike
It is.
LikeLike
Very Diane von Furstenberg! Lovely.
LikeLike
I'd be more than happy to be twins with you Maria – lets see how I get on! 😉
LikeLike
Love this wrap Maria 🙂 Fabulous fabric!
LikeLike
Love your new dress Maria – Spotlight is sometimes worth the hunt for a good roll of cloth.
LikeLike
Fantastic dress. It looks so polished…and comfortable!
The fabric is great.
LikeLike
What a cute little collar! I like your fabric very much too 🙂
LikeLike
Thanks Catherine.
LikeLike
It's a good work dress.
LikeLike
You never know. I picked up some great duckcloth for $8/m a few weeks ago.
LikeLike
It is comfortable Vanessa. There's a tropical version to come too.
LikeLike